Congratulations! You’ve been identified as an eligible recipient for the $PIXFI Airdrop claim, a fantastic opportunity to get your hands on this exciting new cryptocurrency. This guide will walk you through the simple process of claiming your $PIXFI tokens, ensuring you don’t miss out on this chance to be a part of the Pixelverse.
$PIXFI is the native token of the Pixelverse, a captivating new blockchain gaming ecosystem. By claiming your Airdrop, you’ll be well on your way to exploring the vast and immersive world of Pixelverse games, interacting with other players, and potentially profiting as the $PIXFI token gains traction.
There are two primary methods for claiming your $PIXFI Airdrop: through PixelTap, the Pixelverse mobile app, or via the Pixelverse dashboard. Both methods are straightforward and can be completed within a few minutes. Let’s delve into each approach in detail:
Claim Your $PIXFI Airdrop Through PixelTap
1. Launch PixelTap: Begin by opening the PixelTap bot on your mobile device from the Telegram app.
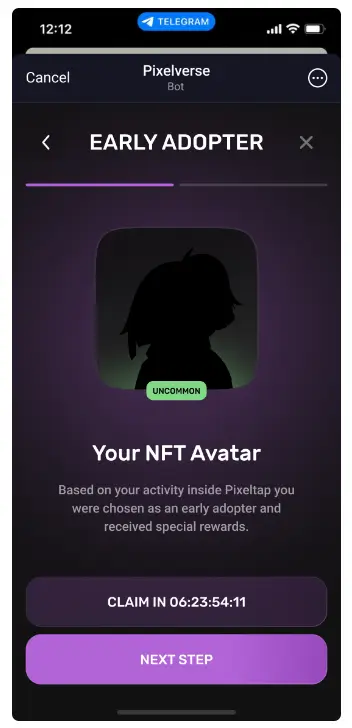
2. Locate the “CLAIM” Button: Upon launching PixelTap, you’ll be greeted by the app’s main screen. Look for a prominent button labeled “CLAIM.” This button serves as your gateway to securing your $PIXFI Airdrop.

3. Navigate Through the Steps: With a tap on the “CLAIM” button, you’ll initiate the claiming process. A sequence of screens will appear, guiding you through the steps. On the subsequent screen, click the “NEXT STEP” button to proceed.
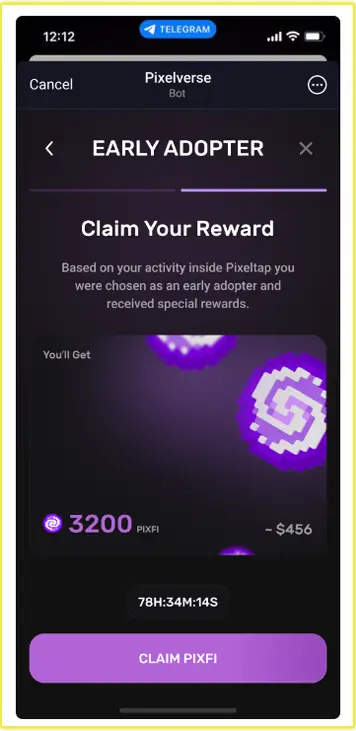
4. Claim Your $PIXFI: The next screen will present you with a button that reads “CLAIM PIXFI.” This is the moment you’ve been waiting for! Click confidently on this button to claim your $PIXFI Airdrop officially.
5. Provide Your Wallet Address: Following your decision to claim, you’ll be prompted to enter your ERC-20 compatible, non-custodial wallet address. Essentially, this is the digital address where your $PIXFI tokens will be deposited. If you’re unfamiliar with ERC-20 wallets, fear not! Popular options like MetaMask or Trust Wallet are excellent choices for storing your $PIXFI tokens.
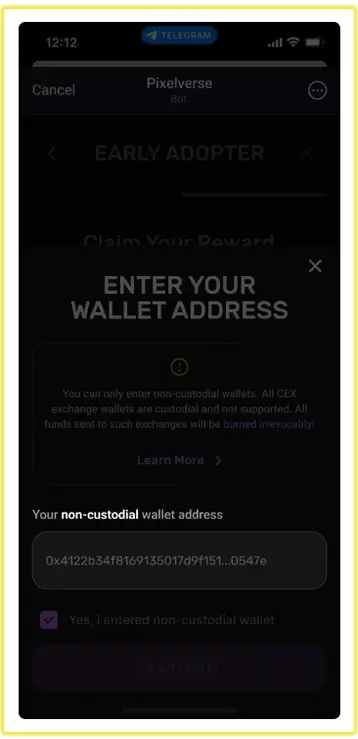
Crucially, ensure you enter a valid and accurate wallet address. Double-check the address meticulously before proceeding to avoid any mishaps with your $PIXFI Airdrop.
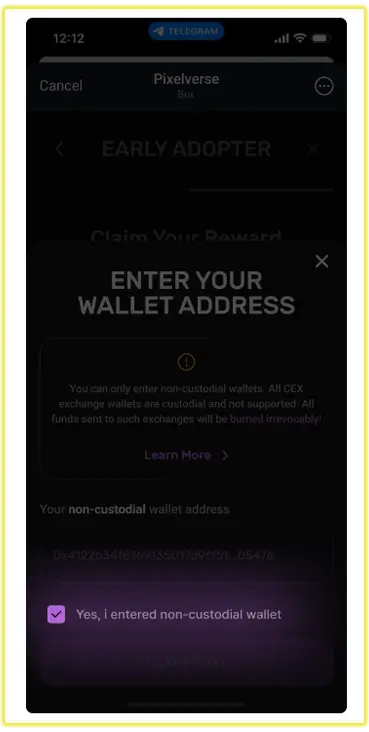
6. Confirm Wallet Eligibility: Before finalizing the claim, it’s beneficial to confirm that the wallet you’re using is eligible to receive $PIXFI tokens. While most ERC-20 wallets should be compatible, it’s always wise to exercise caution.
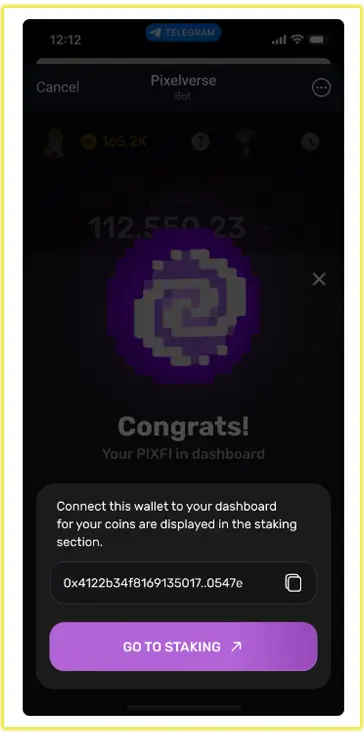
Congratulations, you have received your $PIXFI tokens! To manage your assets, go to dashboard.pixelverse.xyz/staking
See; What is Pixelverse? (Is it a Crypto Currency or an Airdrop?)
Pixel Tap Daily Combo Cards Today
Claiming Your PIXFI Airdrop Through the Pixelverse Dashboard
1. Access the Pixelverse Dashboard: If you prefer a web-based approach, you can claim your $PIXFI Airdrop through the Pixelverse dashboard. To get started, navigate to your web browser and visit the Pixelverse dashboard using your computer.
2. Locate the “Early Adopter” Section: Once you’ve arrived at the Pixelverse dashboard, find the section designated for “Early Adopters.” This section acknowledges and rewards those who have been involved with the Pixelverse project from its early stages.
3. Proceed to “CLAIM PIXFI”: Within the “Early Adopter” section, you should locate a subsection specifically dedicated to “CLAIM PIXFI.” This is where you’ll initiate the claiming process directly through the Pixelverse dashboard.
4. Enter Your Wallet Address: Similar to the PixelTap method, you’ll be required to provide your ERC-20 compatible, non-custodial wallet address during this stage. Remember, this is where your $PIXFI tokens will be deposited.
Double-check the accuracy of your wallet address before proceeding. A typo or error could result in a delay or even the loss of your $PIXFI Airdrop.
Article Source; PIXFI Claiming Guide